
Subscribe to the podcast -- RSS and iTunes and Google Play
Check out our Reddit page for discussion -- http://reddit.com/r/welikedota
Follow us on Twitter -- http://twitter.com/welikedota
Support us on Patreon -- http://patreon.com/welikedota
Guest Post! Tread Switching - the Liberace Method
I first want to thank Sam “The Plaid Pirate” for giving me the opportunity to share with you, the reader, the secrets of tread switching. I’ve uncovered these secrets through hours of playing Dota, hearing casters refer to tread switching, and then Googling “tread switching” to find out what they meant. If you follow Dota on Reddit, you may know that tread switching is one of the very basic tricks that all the 9k Redditors know, like countering entire heroes with one item (BKB), and only losing because of the Peruvians on your team. Understanding tread switching will add somewhere around 2,000 to 3,000 MMR to your solo account – you’re welcome! (therefore my actual MMR in the absence of my tread switching ability is somewhere between 300 and negative 700)
More seriously [No, probably not more seriously – Ed.], tread switching is one of the many game mechanics in Dota that is completely unexplained and likely emerged from players’ actual play, rather than being an express design decision of IceFrog. It gives you some more efficiency in resource use (hp and mana), and critically makes you feel like a professional dota player. The esteemed gamer Sean “Day[9]” Plott explained in one of his “Day[9] Dailies” that esports and gaming are great because you can watch what professionals do and then do that very thing in a game against your own peers, and feel good about yourself, even if you’re never going to win GSL or an International. So really, tread switching is about positivity and feeling good about yourself! Tread switch, WLDers - you’re worth it!
Mechanics
Here’s how it actually works: when Dota adds or subtracts attributes (STR, AGI, INT) from a hero, it maintains the same percentages of hp and mana that the hero had before the attribute change (throughout this essay I will use the term “attribute” to refer to STR, AGI, and INT, and “resources” to refer to hp and mana). This is why, for example, when Undying throws a couple Decay stacks on you, you have “full” health, even though you’ve only got 200 hp. What’s interesting about this is when you combine 1) Power Treads’ ability to quickly move around attributes with 2) the expenditure of resources, mainly (though not exclusively) mana.
An example: Say you are Dragon Knight (a STR hero) and have 300 mana without Treads, and you’d like to cast Level 1 Dragon Tail – a spell that costs 100 mana. You do so, and you now have 200 mana, or 67% of your previous total. This, I think, is fairly straightforward.
Since you’re playing DK, you buy Treads. In STR form, they add the normal +25 attack speed and +45 movement speed, but also 180 health, some health regeneration, and +9 damage. But you want to stun your opponent, so you switch to INT on your treads, which among other things not relevant to our example adds 108 mana, so your total mana pool is now 408. You cast Dragon Tail, which costs 100 mana, and you now have 308 / 408, or around 75% of your pool. Here’s where the magic happens: when you switch back to STR, Dota maintains your percentage of expended mana, and you have 225/300 instead of 200/300. Free 25 mana!
This works in all sorts of examples, too, some of which I’ll mention in the next section. It doesn’t seem like much, but when you’re dealing with spells that have low cooldowns and low mana costs, it can add up and really improve your efficiency.
What follows is a brief explanation of how you can learn to do this. It is how I went about learning tread switching, and so it is almost certainly the objectively correct one. Behold: The Liberace Method.

The best part of the picture is the scepter he’s holding.
For whatever reason, I decided early on in my Dota “career” to learn to do it and incorporate it into my muscle memory so if I ever got better (spoiler alert: not going so well!) I’d at least have that little mechanic down. I used to play quite a bit of Starcraft II, and I always insisted on playing “the right way,” even if I did so poorly, so I would have a good foundation on which to improve (spoiler alert: it didn’t go so well!). That’s maybe not “fun,” and it’s incredibly nerdy and actually kind of embarrassing to type out, but that’s how I approach games like this for myself.
Step 1: Regen
An easy tip for Treads that I think most people know is to only use your Bottle to regen hp and mana when your Treads are on AGI. Since your hp and mana are then at a relative minimum raw value, Bottle’s +75 of the resource increases it by the largest percentage, which is then maintained when you switch back to INT. So if you’re playing Storm Spirit or Windranger, make sure you’re on AGI when Bottling! And, of course, AGI for the Fountain and Shrines as well.
Step 2: Spam Low-CD, Low-Mana Spells
The easiest way IMO to learn to tread switch for casting is to pick heroes who do it a lot, usually in situations where you’re not under pressure from the enemy team. My chosen hero was Slark.
Example: Dark Pact costs 40 mana at Level 4, on a 6 second cooldown. It does 300 damage to enemy units around him, and while he takes 150 damage, he also heals super fast when nobody can see him so it’s not that important. During that mid-game period when you’re AFK farming instead of teamfighting and your teammates are pinging you and All-chatting “Report slark jajaja,” going from camp to camp Dark Pacting them all down speeds up your farm a lot.
Slark is an AGI hero, so generally my Treads are on AGI. But when I cast Dark Pact, I switch them to INT, so the 40 mana is paid from a larger pool, then switch back to AGI for the damage and armor when I’m right-clicking the creeps that I’m farming. I keep my Treads on “S,” and have “Q” for Dark Pact, so my routine is S-S-Q-S. That’s “AGI to STR,” “STR to INT,” “Dark Pact,” “INT to AGI.” Now, if you’re really pro, you can have them on STR while the 150 health is counting down, so you can execute S-S-Q-S-S-[wait for the hp expenditure to complete]-S-S. But that’s above my pay grade, and I’ve watched Arteezy and EE play Slark on stream and they don’t even do it. But it is technically more efficient, I think.
This also ought to be done with Anti-Mage’s Blink – S-S-W-click on target location-S. Anti-Mage and Slark are heroes who don’t have huge mana pools early or much mana regen necessarily, so this actually keeps you out on the map quite a bit more than if you just stuck on AGI and did it. So pick heroes like that – even in a practice lobby – and just SSQS and SSWclickS around the map training your muscles to do this. Before you know it, you’ll be like this:
Step 3: Complicated (read: Fun) Stuff
I also buy Treads on Medusa because with Mystic Snake, you can have almost infinite casts of it. She’s an AGI hero, so stay on AGI most of the time, but then switch to INT when casting Snake, but switch back to AGI before it comes back, because it adds raw mana and when your Treads are on not-INT, you have a smaller mana pool and it will increase your mana by a larger percentage. Necrophos is another fun one because Death Pulse costs mana and heals hp, so you cast it while on INT, then when regenning mana and hp from what used to be Sadism, you should be on AGI because the regen is raw numbers and AGI treads provide the relative minimum for those resources.
But there are cooler examples, too. Clinkz is another hero who usually builds Treads, and with a Soul Ring and his ultimate ability Death Pact, Treads can extend his resources almost indefinitely (until you walk under a Sentry Ward and get Laguna Bladed). Soul Ring costs hp and gives raw mana, so you switch to STR Treads, use the Soul Ring active, then switch to INT Treads to cast Death Pact which gives you hp, then cast Invisibility. The calculations are complicated, especially when incorporating Death Pact’s weird treatment of hp, but you can do the whole thing at almost no cost. I use “X” for my Soul Ring, so it’s S-X-S-R-E, then I go fail a gank.
There are probably countless more cases that I haven’t listed. Have fun, explore the hero pool, and find your own!
Summary
Follow these steps:
1) use a Bottle efficiently so you get the idea of flat regen having the most effect on AGI;
2) practice some spammy, low CD, low mana spell, like Dark Pact or AM Blink;
3) move on to more complicated heroes like Medusa or Clinkz;
4) say “yes” when PPD calls you to play for EG, to replace his carry who left for another team.
Thanks for Sam for the opportunity to write this. I hope I wasn’t wrong about too many mechanics, and someone was at least entertained a little, even if my advice was crummy. I love the WLD community and was excited to be able to contribute to it.
Best,
CherLiberace ([Cher] Jm J. Bullock]
We Like Dota #148 - Kiev Qualifiers/Keeper of the Light
Subscribe to the podcast -- RSS and iTunes and Google Play
Check out our Reddit page for discussion -- http://reddit.com/r/welikedota
Follow us on Twitter -- http://twitter.com/welikedota
Support us on Patreon -- http://patreon.com/welikedota
Stories From the Sideshop #7 - Kelly O'Dell
Kelly and Sam chat about Dota and sports
Subscribe to the podcast -- RSS and iTunes and Google Play
Check out our Reddit page for discussion -- http://reddit.com/r/welikedota
Follow us on Twitter -- http://twitter.com/welikedota
Support us on Patreon -- http://patreon.com/welikedota
Attack Speed: Part 1
This post comes to you, dear reader, from Friend of the Show Arian. This is the first of a three-part series on Attack Speed and Damage. Enjoy!
Ask yourself this: What is the most basic way of inflicting damage in Dota 2? My first answer to that question would obviously be Sniper. My close second would be the Auto-Attack. Casting spells interacts with the mana mechanic and spells also have different ways of dealing damage through their damage type. Each spell is unique and has a different twist to it. In short, spells are hard. Auto attacks, on the other hand, are literally just hitting a hero in the face. However, you would be mistaken if you think that Auto-Attacking is not convoluted – this is Dota, after all. Much like a martial arts, simply hitting someone in the face can become complicated very quickly.
To best understand the ancient art of Kung-Dota, I will try to break it down in following three sections: 1) attack time, 2) the relationship between attack speed and damage, and crits and bashes. We’ll only briefly touch on orb attacks, because they are slowly getting phased out of Dota. Armor is also hugely important but luckily that topic was already explained in detail by your favorite Coffee-Grinder. Since you now know that a load of mechanics is coming right at you, now is your last chance to run. For everyone remaining, stand tall, and let’s start learning some martial arts.
Attack Time
The attack time consists of the actual attack animation (also referred to as attack point), the so-called attack back-swing, and an idle period so the system can’t be abused (more on that shortly). Let’s take these one by one. The attack animation, according to Dota 2 Wiki, is the delay between when an attack command is issued and the damage is dealt. Let’s pretend we’re everyone’s favorite Ogre, Alchemist. If our theoretical alchemist decides to get punchy, . the animation is his arm punching right up to the moment the actual damage is inflicted. The ogre returning his arms to their original position is the back-swing, and the period between the end of the back-swing and the launching of the next attack is the idle period. Check out the picture below:

I know what you sly dogs are thinking. After I deal damage, why don’t I just cancel my animation and skip this boring, slow, back-swing bit? Well, IceFrog outwitted us newbs once again. The idle exists so you can’t improve your attack speed by cancelling your animation. If you cancel your attack mid-backswing, after your attack was launched, your idle period extends to the time your backswing would have taken to finish plus your normal idle period. This is also why people sometimes complain about bad attack animations. Some heroes have a very fast attack animation and backswing (Anti-Mage comes to mind), and a very long idle. That makes last hitting easier because the hero responds much faster to your attacking-command. Other heroes, like Zeus, have a very long attack animation and a short Idle. The Idle period makes it so that Anti-Mage doesn’t automatically have better attack speed than Zeus only because he has a faster animation.
Every hero has a base attack time, which is 1.7 seconds for most heroes. Base attack time is the default interval between attacks assuming 0 agility and no attack speed bonus. From base attack time, we can figure out a few important things: 1) we can calculate attacks per second 2) we can calculate how much time passes between each attack. For those of you who enjoy math (from Dota 2 Wiki):
How does this relate to the game itself? After the time between attacks is calculated, the length of your attack animation, idle period and back-swing is adjusted so they add up to whatever your time between attacks is. TLDR; This is why our buddy Alch’s animation gets faster and faster as he gets more items throughout the game. The lowering of base attack time explains the attack speed portion of Alchemist’s ult. His ult lowers his base attack time, meaning every point of attack speed he has improves his time between attacks even more, resulting in the ridiculous attack speed you sometimes see on that hero.
Your Base attack time is also what determines the maximum number of attacks per second (some call it the attack speed cap). If your base attack time is 1.7 you cannot go lower than a certain value of attacks per second. Some heroes have a better base attack time, like Anti Mage, which means his maximum attacks per second is higher. It also means he gets more value out of buying attack speed/agility items.
For all the lazy, immediate-gratification-seeking readers, here are the magic words:
TOO LONG DID’T READ:
- Attacking Consists of Three stages
- You can NOT increase your attack speed with animation cancelling
- Your base attack time determines how much attack speed items improve your attack speed
- Your base attack time determines your maximum attacks per second
Early-Game Radiant Warding for my 2k Brethren
Folks, full disclosure here - I'm on the worst losing streak of my Dota career. I'm on a 7 game skid, and 5-15 over my last twenty. Losing might be what I do best, but that doesn't have to be your destiny. After some reflection, I realized that I often find myself as a solo support in my pub games. This, needless to say, is difficult. Almost immediately, it seems, the four carries on my team simultaneously crack their knuckles, lean back in their gaming chairs, and load up their chat wheel. We need wards. We need wards. We need wards. In response, I grin as I alt-left click the wards to proudly proclaim "I will purchase -> Observer Ward (out of stock 1:32)."

The sweetest reply to your greedy, somewhat foolish carries
This post will help you place these hard-earned wards effectively, focusing on the (very) early-game from the Radiant perspective. Don't waste your wards folks, you worked too damn hard for those gold coins.
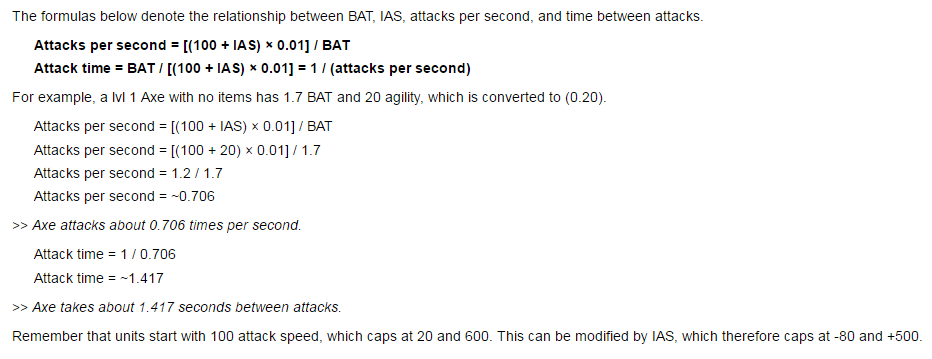
So, minute 0. You pick your favorite support, because you're a good person. You put other people's pleasure above your own. You want your teammates to achieve their best possible selves. Thank you, support player. You immediately buy a courier and two wards, because you rock. But what to do with those wards? In a perfect world, you could give each lane a vision advantage. Alas, IceFrog has only bestowed upon us 2 wards at the start. So immediately you are faced with some difficult choices. Here's my 2k advice - the safe lane ALWAYS gets a ward. Why? Your hard carry, your position one, lives there. By definition, he or she is the one that gets top farm priority, and is the one that's going to carry your little support azz to victory. Two, you're there! You're the position 5, so you're going to be babysitting the safe lane. Don't make the game harder than it already is - give yourself a vision advantage. You bought the damn ward, so treat yo self.

Aim to put your lane ward right in that orange box

Ohh yes please give me more of that sweet, sweet vision
Please see the above screenshots for where I like to put the first ward of the game. Is this groundbreaking, or an abnormal spot to place a ward? No. Will it get dewarded? Doubtful. The reason it won't get dewarded is because supports on the other team are just as poor as you are. Some folks might be upset that your ward didn't provide vision of the rune. Too bad, teammates. 7.xx placed LOTS of runes around the map, and you controlling the action rune doesn't take priority over better protecting the carry.
However, we do want to help out our midlaner. I believe giving your mid a vision advantage is key for a number of reasons. In no particular order: 1) Midlaners generally believe that they're the most talented player to ever install the game 2) They need this irrational confidence because they're (usually) in a 1v1 matchup 3) A happy midlaner means a happy team 4) A happy midlaner is far more likely to help you out and gank your lane. Think of the midlaner as a quarterback on a football team. Can you win with a below average one? Just ask Super Bowl champion Trent Dilfer and the 2000 Baltimore Ravens. Would I much rather play on a team with Tom Brady? I mean, just look at that guy. Now he's got a ring for the thumb. What I'm saying is the mid lane is real freakin' important, okay? Help that guy or gal out as best you can. You want him/her on your side, not raging. You can even go along and give him the ward at the start of the game. Or, if you want to take matters into your own hands, put the ward on the Dire's side of the river:
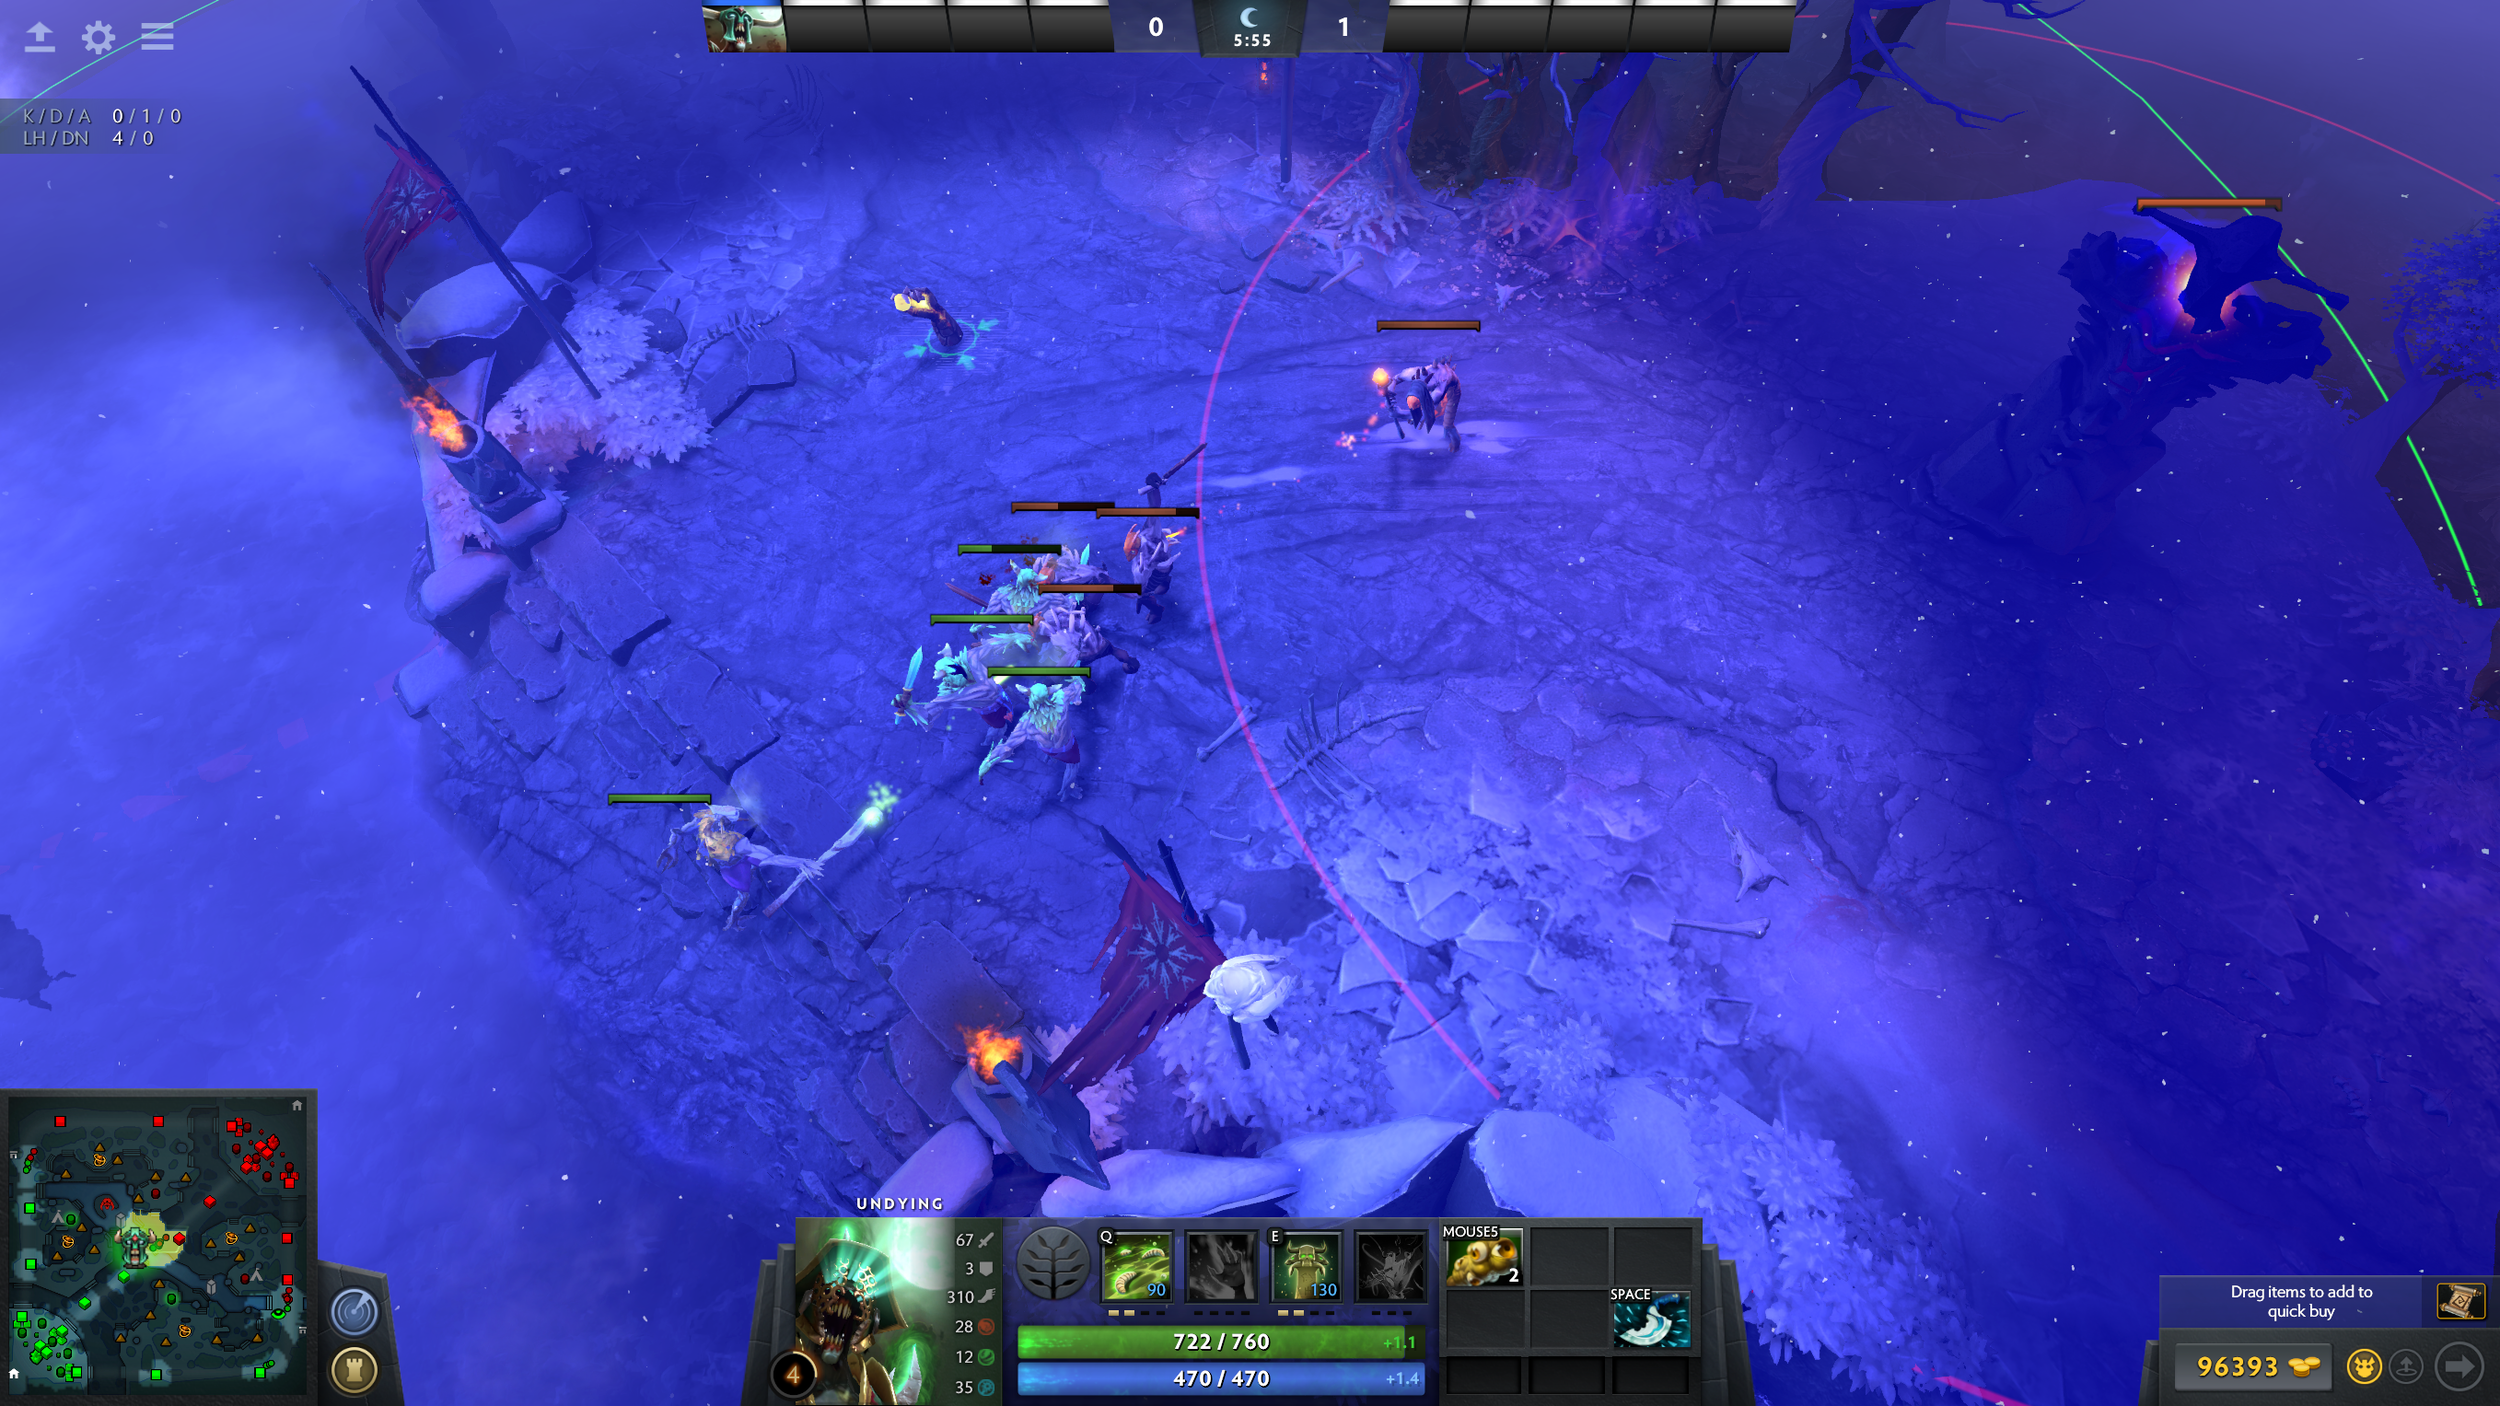
This will give your Radiant buddy a much better time in lane, as he or she will be able to track the opposing mid's movements and hopefully crush the lane. Just don't put it under tower, and don't let the opposing team see you do it. If the creep quilibrium is as pictured, wait until Dire no longer has vision. It's a real bummer to have the mid dewarded.
Ok, ok I know what you're saying. What about the off lane? That hero is going to get ganked from the very scary jungle! And you're right, we left him/her out to dry. But these are the early choices that Dota forces you to make. There are not unlimited resources. Let's look at the decision at the margins. An observer ward lasts for 360 seconds (6 minutes). It takes 150 seconds (2 and a half minutes) for a ward to replentish in stock. So essentially the question is, can your off lane survive for the first three minutes of the game without a ward (assuming about thirty seconds for courier use)? I think they should be able to. Here's the general location I'd suggest you ward in the off lane:
Like everything else in Dota, these suggestions are just that - suggestions. If you have a solo off laner who is up against a tri-lane, give that buckaroo a ward (perhaps even at the expense of your mid). In subsequent posts we'll cover what to do when the options are more expanded and wards begin to come off cool down. Till then, stand tall.
A Word About Armor
What are all these small numbers next to my hero portrait? Why are they in the way of Terrorblade's intimidating features? Why is my hero so dang squishy to right-clicks, especially in the late game (or, if you're feeding like me, for the entire game)? Trigger warning: This post will contain math. As our good friend Cheeks would say, Dota is just one giant math equation, so buckle up buckaroos.
Pictured below is a wonderful Terrorblade, prancing about in a practice match. The two red arrows point us towards his armor. What does armor do? Armor decreases the amount of damage you take from physical attacks (enemy right clicks, as well as lots of abilities like Anchor Smash, Quill Spray, Shadow Wave, Slithereen Crush, etc).
The number in grey is his main armor. Main armor is defined as a hero's base armor plus armor gained by agility. Base armor is different for each hero - Terrorblade starts with 7. Don't worry too much about base armor - IceFrog assigns each hero their base armor and there's nothing you can do to change it. But to understand main armor, you need this component. So once you take into consideration Terrorbale's armor gain from agility, and you wind up with 10.14, which gets rounded up to 11. Here's a fun math equation for all of you keeping score at home:
main armor = base armor + (agility * (1 / 7)).
10.14 = 7 + (22 * (1/7))
Again, that 10.14 gets rounded up to 11, and represents Terrorblade's main armor, which you see in grey. Each point in agility gets you a whopping 1/7th of a unit of armor. Is it super important that you remember that 7 points in agility equals 1 unit of armor? Probably not, but we're doing a deep dive into armor, so this is what you get.

Terrorblade starts with a boat load of armor...
The green number is the amount of armor gained from items. The armor bonus received from items does not transfer to illusions. So here's the best way to think about armor - it makes your hit point pool bigger. This idea is called Effective HP - as you increase armor, it takes more physical damage to bring you down. So here's another fun math equation:
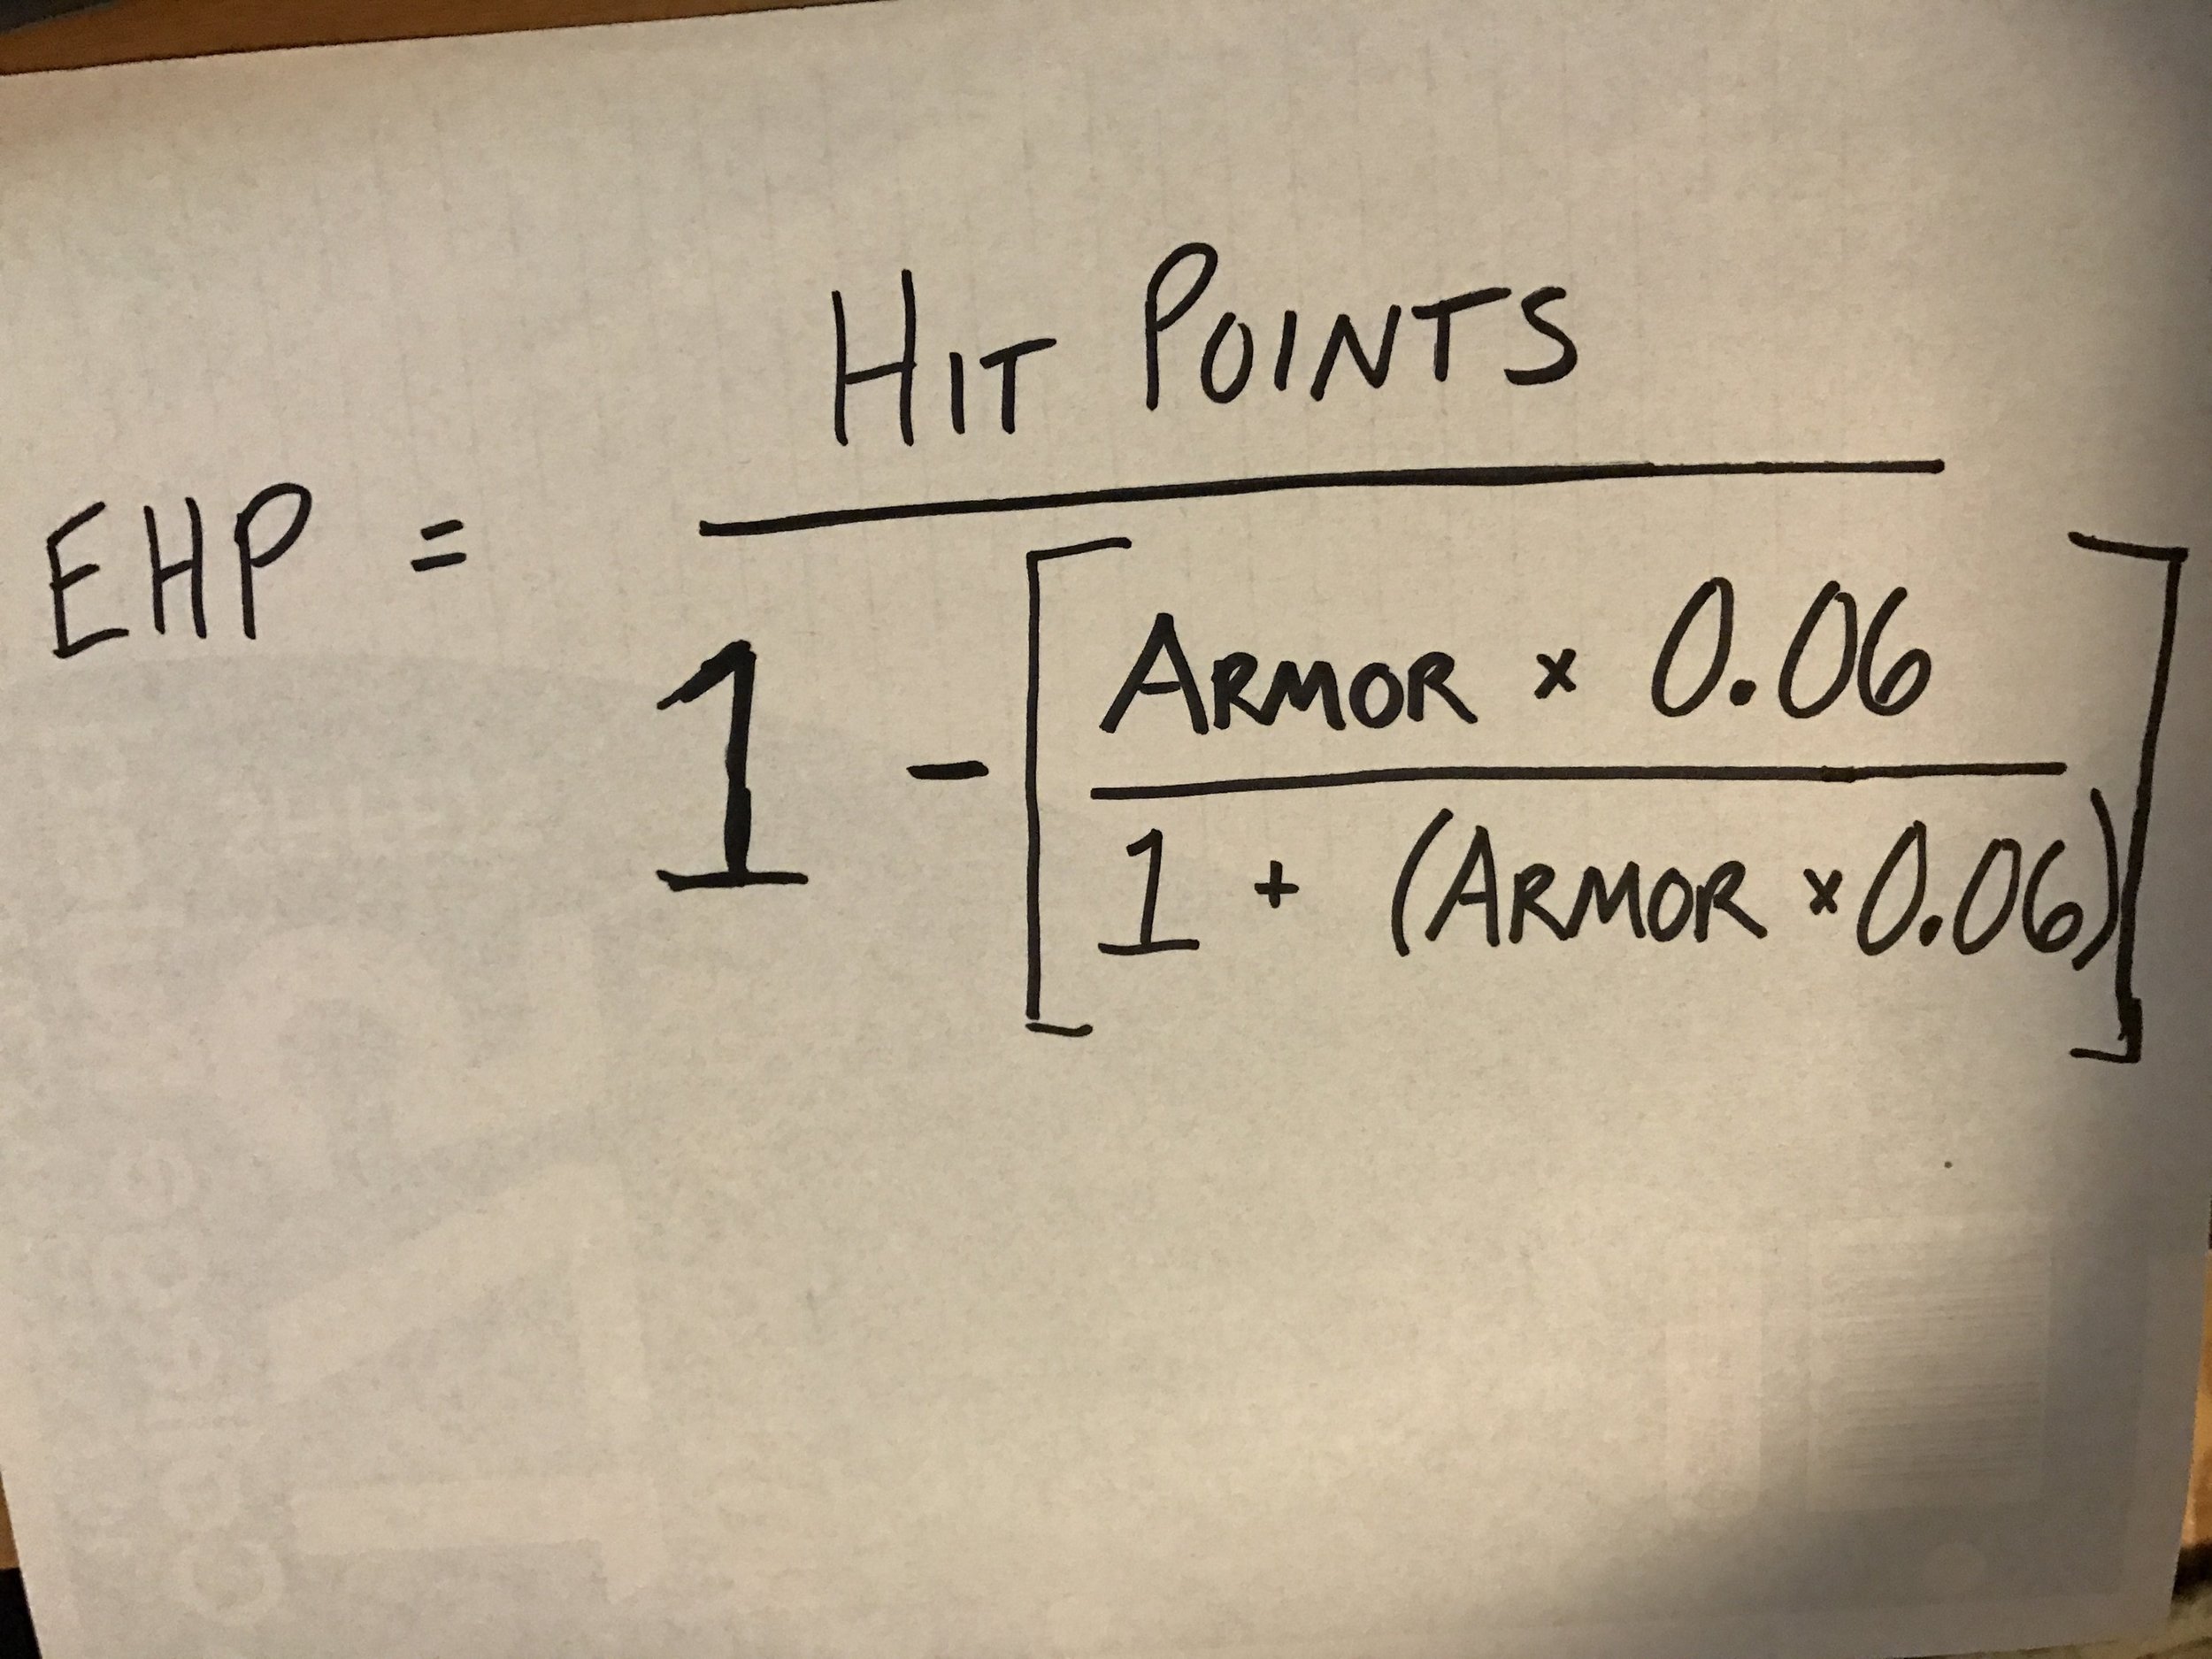
Effective HP!
Once you get over the shock of high school algebra, that handy-dandy equation allows you to understand that armor stacks linearly. Check out the table below. Assume you have a hero who has 1000 hit points. If my squishy, make believe hero has 0 armor, his Effective HP is also 1000. Now let's say we get a gift-card for 1400 gold coins and buy ourselves a platemail. Our platemail gives 10 armor, so Effective HP jumps up to 1600. In this example, our 10 armor gave us 600 additional hit points. Now say there was a 2 for 1 special going on at the Secret Shop, so we have two platemails in our inventory. Now our armor is 20. Our fine hero now has an effective HP of 2,200! On the margins, we gained another 600 hit points. That's what we mean when we say armor stacks linearly.

The key take-away from all this - armor will help you from getting right clicked down, but not from getting nuked. Armor will help you tank up against physical attacks, even if you already have an armor item in your inventory. I find myself doing this frequently when I'm playing Undying. I'll buy a Blade Mail in the early mid-game, and then pat myself on the back and never consider another armor item. The earlier acquisition of Blade Mail shouldn't affect my decision later in the game - if I'm against a physical-heavy lineup, I should definitely consider a Plate Mail to build into a Lotus Orb or a Shiva's Guard. So - buy armor! It'll help. I promise.
We Like Dota #147 - Kiev Invites / Razor
Subscribe to the podcast -- RSS and iTunes and Google Play
Check out our Reddit page for discussion -- http://reddit.com/r/welikedota
Follow us on Twitter -- http://twitter.com/welikedota
Support us on Patreon -- http://patreon.com/welikedota
The All-Push Strat
The other night I was playing with a lovely WLD 5 stack. I was playing Bounty, and you can see the rest of our lineup in the picture below (Radiant team). What we didn't count on was the opposing team going all in on a push strat. They laned Nature's Prophet, Lone Druid, and Troll Warlord together. By minute two, we lost our safe-lane tower. At minute three, our tier 2 was down. To our credit, we rallied and made a game of it. We lost a 42 minute game, even though the kill score was 79-23 in our favor. At one point we had a 40,000 gold advantage.
Like any game (Dota related or any other sport), there was no one reason we lost. There were moments where we needed to push and send one person to defend our base, but instead two or three TPed back. There were moments in the early game where a few rotations could have punished their aggression. We could have itemized better to deal with supers and megas. Ultimately, though, it was a really fun game. It was a different type of challenge, and one that I'll learn from. And one that we'll definitely employ come the 24 hour stream. Mostly, though, #gameishard

Bane vs Sniper Mid
The Plaid Pirate talks about Bane and Sniper in an early game mid matchup
We Like Dota #146 - 12 Hour Stream Update / Slardar
Subscribe to the podcast -- RSS and iTunes and Google Play
Check out our Reddit page for discussion -- http://reddit.com/r/welikedota
Follow us on Twitter -- http://twitter.com/welikedota
Support us on Patreon -- http://patreon.com/welikedota
Stories From the Sideshop #6 - [Cher] Jm J. Bullock
Sam and Jim kick it real smooth
Stories From the Sideshop #5 - Dreamz
Sam and Josh shoot the breeze and chat some sweet, sweet dotez
We Like Dota #145 - Dark Moon / Witch Doctor
Subscribe to the podcast -- RSS and iTunes and Google Play
Check out our Reddit page for discussion -- http://reddit.com/r/welikedota
Follow us on Twitter -- http://twitter.com/welikedota
Support us on Patreon -- http://patreon.com/welikedota
Stories from the Sideshop #4 - NOLA
Sam and Ms. Pirate visit his old college roommate Ben "d1ssadat" Long in New Orleans to talk video games and nostalgia.
We Like Dota #144 - UI Updates / DAC Again? / Luna
Subscribe to the podcast -- RSS and iTunes and Google Play
Check out our Reddit page for discussion -- http://reddit.com/r/welikedota
Follow us on Twitter -- http://twitter.com/welikedota
Support us on Patreon -- http://patreon.com/welikedota
Offlane Gaming ep009
Subscribe to the podcast -- RSS and iTunes
Check out our Reddit page for discussion -- http://reddit.com/r/welikedota
Follow us on Twitter -- http://twitter.com/welikedota
Support us on Patreon -- http://patreon.com/welikedota
Stories from the Sideshop #03 - Elihu
Sam and Elihu talk fatherhood, faith, the Dota support life, and more!
Subscribe to the podcast -- RSS and iTunes
Check out our Reddit page for discussion -- http://reddit.com/r/welikedota
Follow us on Twitter -- http://twitter.com/welikedota
Support us on Patreon -- http://patreon.com/welikedota
We Like Dota - Stories from the Sideshop #2 - Uraniumheart
Sam talks to Nick about music, city living, electrical engineering, Anti-mage, and more!
Subscribe to the podcast -- RSS and iTunes
Check out our Reddit page for discussion -- http://reddit.com/r/welikedota
Follow us on Twitter -- http://twitter.com/welikedota
Support us on Patreon -- http://patreon.com/welikedota
We Like Dota #143 - Stories from 7.00 / Sven
Subscribe to the podcast -- RSS and iTunes
Check out our Reddit page for discussion -- http://reddit.com/r/welikedota
Follow us on Twitter -- http://twitter.com/welikedota
Support us on Patreon -- http://patreon.com/welikedota